
 I've been trying to do a design thing every week. I doodle a lot, and make lots of scratches, and I might show you a few of those, but as a web developer I have to keep my hand into the design side of things. Recently, the magazine Photoshop User had an article on doing "Multi-colored Box Tiles", an effect they consider "a classic." It turned out to be significantly more difficult with the Gimp, but I did finally manage it.
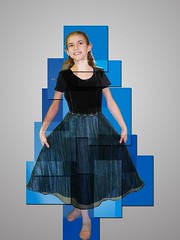
Take your subject in front of a neutral background. Here, I've put my daughter, Kouryou-chan in front of a medium blue background with a slight lighting gradient. Open the Layers dialog (Windows -> Dockable Dialogs -> Layers, or CTRL-L). Now create four new layers (Layer -> New Layer) above your subject. Select the first new layer, set the pen to color #cccccc. Create a couple of random boxes, making sure that one encapsulates the head completely (otherwise it'll just look weird). In the second layer, do the same thing, but using pen color #999999. It's okay if the boxes overlap. In the third, again but this time with color #666666, and in the fourth with color #333333. You should by now have completely obscured your subject.
For each layer, set the Mode to Overlap (On the layer dialog, Mode -> Overlap), and play with the opacities, and you'll get a nifty mosaic effect.
Now for the 3D effect, here's the fun part. Create a new image, transparent background, big enough to hold your subject. Go back to your working image, pull up the selection editor (Select -> Selection Editor). Pick one layer and click on the selection editor. You should see that layer's boxes highlited-- but the selection is inverted, so Select -> Invert Selection. Now copy the selection and what it contains (Edit -> Copy Visible).
Now go to your blank image and Edit -> Paste As -> As New Layer. If you've got a complete copy of Gimp, you should have Layer Effects installed, so you can just Layer -> Layer Effects -> Drop Shadow, but if not, drop shadows are simple: Duplicate the layer, go to the new layer and fill it with a dark grey, blur the edges (Filters -> Blur -> Gaussian Blur), then position in behind your existing layer as you like. Once your drop shadows are nice, merge down the existing collection of boxes on top of its drop shadow layer, so you get a few random boxes and their drop shadows.
Do this with all four layers. Now that you've got all four layers on your new canvas, it's time to play puzzle, moving the four layers to construct the whole image again. You can set the upper layer to 50% opacity; that'll help make sure you've merged the textures correctly. It's just a lot of fiddling; up the magnification to 400% or 800%, that'll also help a lot. Once you're done, set all four layers to 100% opacity again.
For the new background, I just picked a nice grey with a gradient, the glow centered behind the subject's heart.